Debugging Dockerized C/C++ apps with GDBFrontend
Written by Meowing Cat on 5/31/2024, 11:49:00 PM
Learn how to debug C/C++ applications running in Docker containers using GDBFrontend.
Hewwooo, Cat is here again with another tutorial! Today, I will show you how to debug C/C++ applications running in Docker containers using GDBFrontend. Let’s get started!
Docker is amazingly useful for developing and deploying applications. However, debugging applications running inside Docker containers is not as straightforward as debugging applications running on the host machine.
In this tutorial, we’ll learn how to debug C/C++ applications running in Docker containers using Cat’s cute debugger GDBFrontend.
You can get the source code for this tutorial from the GitHub repository gdb-frontend-docker-example.
The PokerUnicorn server uses this workflow to debug the PokerUnicorn server on Docker. You can check the PokerUnicorn GitHub Repository.
What is GDBFrontend?
GDBFrontend is a web-based frontend for the GNU Debugger (GDB). It has the cutest UI and many features that make debugging applications easier.
Some of the features of GDBFrontend include:
- A cute UI that makes debugging applications fun.
- A code editor that allows you to view and edit the source code of your application.
- A disassembly view that shows the assembly code of your application.
- Linked-list visualization that shows the data structures in your application.
- Advanced and feature-rich variable explorer that allows you to inspect the C/C++ objects in your application.
- Code evaluation with variable explorer. You can use many evaluator windows.
- Pointer visualization between evaluator windows.
- Useful breakpoint management.
- Terminal emulator for the GDB shell and also you can create many terminals. You can do everything with GDBFrontend’s terminal view because it is a
tmuxsession. - Registers view
- Web-based UI, so you can access it from any device with a web browser.
- And many more cute features… 🐱
Why use GDBFrontend with Docker?
- One of cute benefits of GDBFrontend, you don’t have to use GDB’s remote which has some limitations.
- Also you can run your Dockerized application with GDBFrontend for test releases; so you’ll be able to debug your application at the test stage.
- All developers will have the same development/debugging environment seamlessly, so you can share your debugging environment with your team.
Prerequisites
Before we start, make sure you have the following installed on your system:
- Docker Desktop
- A cute code editor (for me, it’s VS Code)
Note Another cute thing, we don’t need any compiler or debugger on our host machine because we will build and run our application inside a Docker container.
What about building our app?
Normally, you would compile and run this application on your host machine, but if you are using Docker, you can compile and run it inside a Docker container.
There are some reasons why you might want to do this:
- You might be using a different operating system than the one you are targeting. For example, you might be using macOS and targeting Linux servers.
- Even, you might be using a different CPU architecture than the one you are targeting. For example, you might be using an x86-64 CPU and targeting an ARM CPU.
- You might want to keep your development environment clean and isolated from your host machine.
Step 1: Create a C/C++ application
Let’s create a simple C/C++ application that we can debug. An app that stores cats and lists them would be purrfect!
Create a new directory for your project and add the following files; our example is a C application:
We have these files in our project directory:
app.cMakefiledocker-make.shDockerfiledocker-compose.yml.gdbinit
The app.c source file
#include <stdio.h>

typedef struct cat {
    char* name;
    int meow_count;
    int purr_count;
    int hiss_count;
    int scratch_count;
} cat_t;

cat_t cats[100] = {0};
int cats_i = 0;

int add_cat(cat_t cat) {
    cats[cats_i++] = cat;
    return 0;
}

int main() {
    cat_t meowing_cat;
    meowing_cat.name = "Meowing Cat";
    meowing_cat.meow_count = 1;
    meowing_cat.purr_count = 2;
    meowing_cat.hiss_count = 3;
    meowing_cat.scratch_count = 4;

    cat_t purring_cat;
    purring_cat.name = "Purring Cat";
    purring_cat.meow_count = 5;
    purring_cat.purr_count = 6;
    purring_cat.hiss_count = 7;
    purring_cat.scratch_count = 8;

    add_cat(meowing_cat);
    add_cat(purring_cat);

    printf("Cats:\n\n");

    for (int i = 0; i < cats_i; i++) {
        printf("Name: %s\n", cats[i].name);
        printf("\tMeow count: %d\n", cats[i].meow_count);
        printf("\tPurr count: %d\n", cats[i].purr_count);
        printf("\tHiss count: %d\n", cats[i].hiss_count);
        printf("\tScratch count: %d\n", cats[i].scratch_count);
        printf("\n");
    }

    return 0;
}
The Makefile
We will use this Makefile to build our application. It is simple for this example.
all:
	gcc -o app app.c
The docker-make.sh
We will use this script to build our application inside a Docker container. Also, we will run the application after building it by using GDBFrontend’s HTTP API. 🙀
#!/bin/bash

command="docker exec -it "
command+="cats-gdbfrontend "
command+="make -C /root/gdb-frontend-docker-example && sleep 1 && "
command+="curl http://127.0.0.1:5550/api/runtime/run"

echo $command

eval $command
Important! Don’t forget to make the script executable with
chmod +x docker-make.sh.
Now we have a simple C application that stores two cats and prints their details and lists them and a Makefile to build it. It will look like this:

Step 2: Create a Dockerfile and docker-compose.yml
Next, we need to create a Dockerfile to build our application inside a Docker container.
We will also create a
docker-compose.ymlfile to make it easier to build and run our Docker container. 🙀
The Dockerfile
FROM debian:bookworm

EXPOSE 5550-5550

ARG GDBFRONTEND_BIND_ADDRESS=0.0.0.0

COPY . /root/gdb-frontend-docker-example

RUN printf "deb http://httpredir.debian.org/debian bullseye-backports main non-free\ndeb-src http://httpredir.debian.org/debian bullseye-backports main non-free" > /etc/apt/sources.list.d/backports.list

RUN apt update -y &&
    apt upgrade -y &&
    apt install -y git
                   gcc
                   build-essential
                   make
                   gdb
                   tmux
                   procps
                   python3
    && rm -rf /var/lib/apt/lists/*

WORKDIR /root
RUN git clone https://github.com/rohanrhu/gdb-frontend.git

WORKDIR /root/gdb-frontend-docker-example

RUN echo "set auto-load safe-path /" > ~/.gdbinit

CMD /root/gdb-frontend/gdbfrontend -w /root/gdb-frontend-docker-example -l "$GDBFRONTEND_BIND_ADDRESS"
In this Dockerfile, we are using the debian:bookworm image as the base image.
We are installing the necessary packages to build and run our C/C++ application, including git, gcc, build-essential, make, gdb, tmux, procps, and python3.
Important!
RUN echo "set auto-load safe-path /" > ~/.gdbinitis important because it will allow GDB to load our app’s.gdbinitfile.
The docker-compose.yml
services:
  gdbfrontend:
    container_name: cats-gdbfrontend
    build: .
    restart: always
    user: "0:0"
    ports:
      - "5550:5550"
    volumes:
      - .:/root/gdb-frontend-docker-example
    networks:
      cats:
        aliases:
          - gdbfrontend
    environment:
      GDBFRONTEND_BIND_ADDRESS: 0.0.0.0
networks:
  cats:
The .gdbinit file
We will use this file to set the GDB configuration for GDBFrontend to work properly with our application.
cd /root/gdb-frontend-docker-example
set confirm off
set pagination off
set non-stop off
handle SIGPIPE nostop noprint pass
shell make
file app
shell tmux split-window
shell echo "tty $(tmux list-panes -F '#{pane_index} #{pane_tty}' | awk -v target=1 '$1 == target {print $2}')" > /tmp/gf-cmd-pane-tty
source /tmp/gf-cmd-pane-tty
r &
set scheduler-locking step
This .gdbinit file will configure our GDB for most usual cases. You can modify it according to your needs.
It also runs the make command to build and runs our app on startup; this means your app will be ready to debug when you start your Docker container.
Note
set scheduler-locking stepis very useful for debugging multi-threaded applications. Cat recommends using it. 😇
Note We’ve also configured our GDBFrontend tmux session to have two panes. The first pane is for the GDB shell, and the second pane is for the application output.
Step 3: Build and run the Docker container
Now we have our Dockerfile and docker-compose.yml files, we can build and run our Docker container and we have a docker-make.sh script to build our application inside the container from the host machine.
To build and run the Docker container, run the following commands:
docker-compose up -dThis command will build the Docker container and run it in the background.
Step 4: Build the C/C++ application inside the Docker container
Now our Docker container is running, we can build our C/C++ application inside the container using the docker-make.sh script that we’ve just created.
To build the application inside the Docker container, run the following command:
./docker-make.shMeow! 🙀 this command will build the C/C++ application inside the Docker container and run it.
Step 5: Debug our Dockerized C/C++ application using GDBFrontend
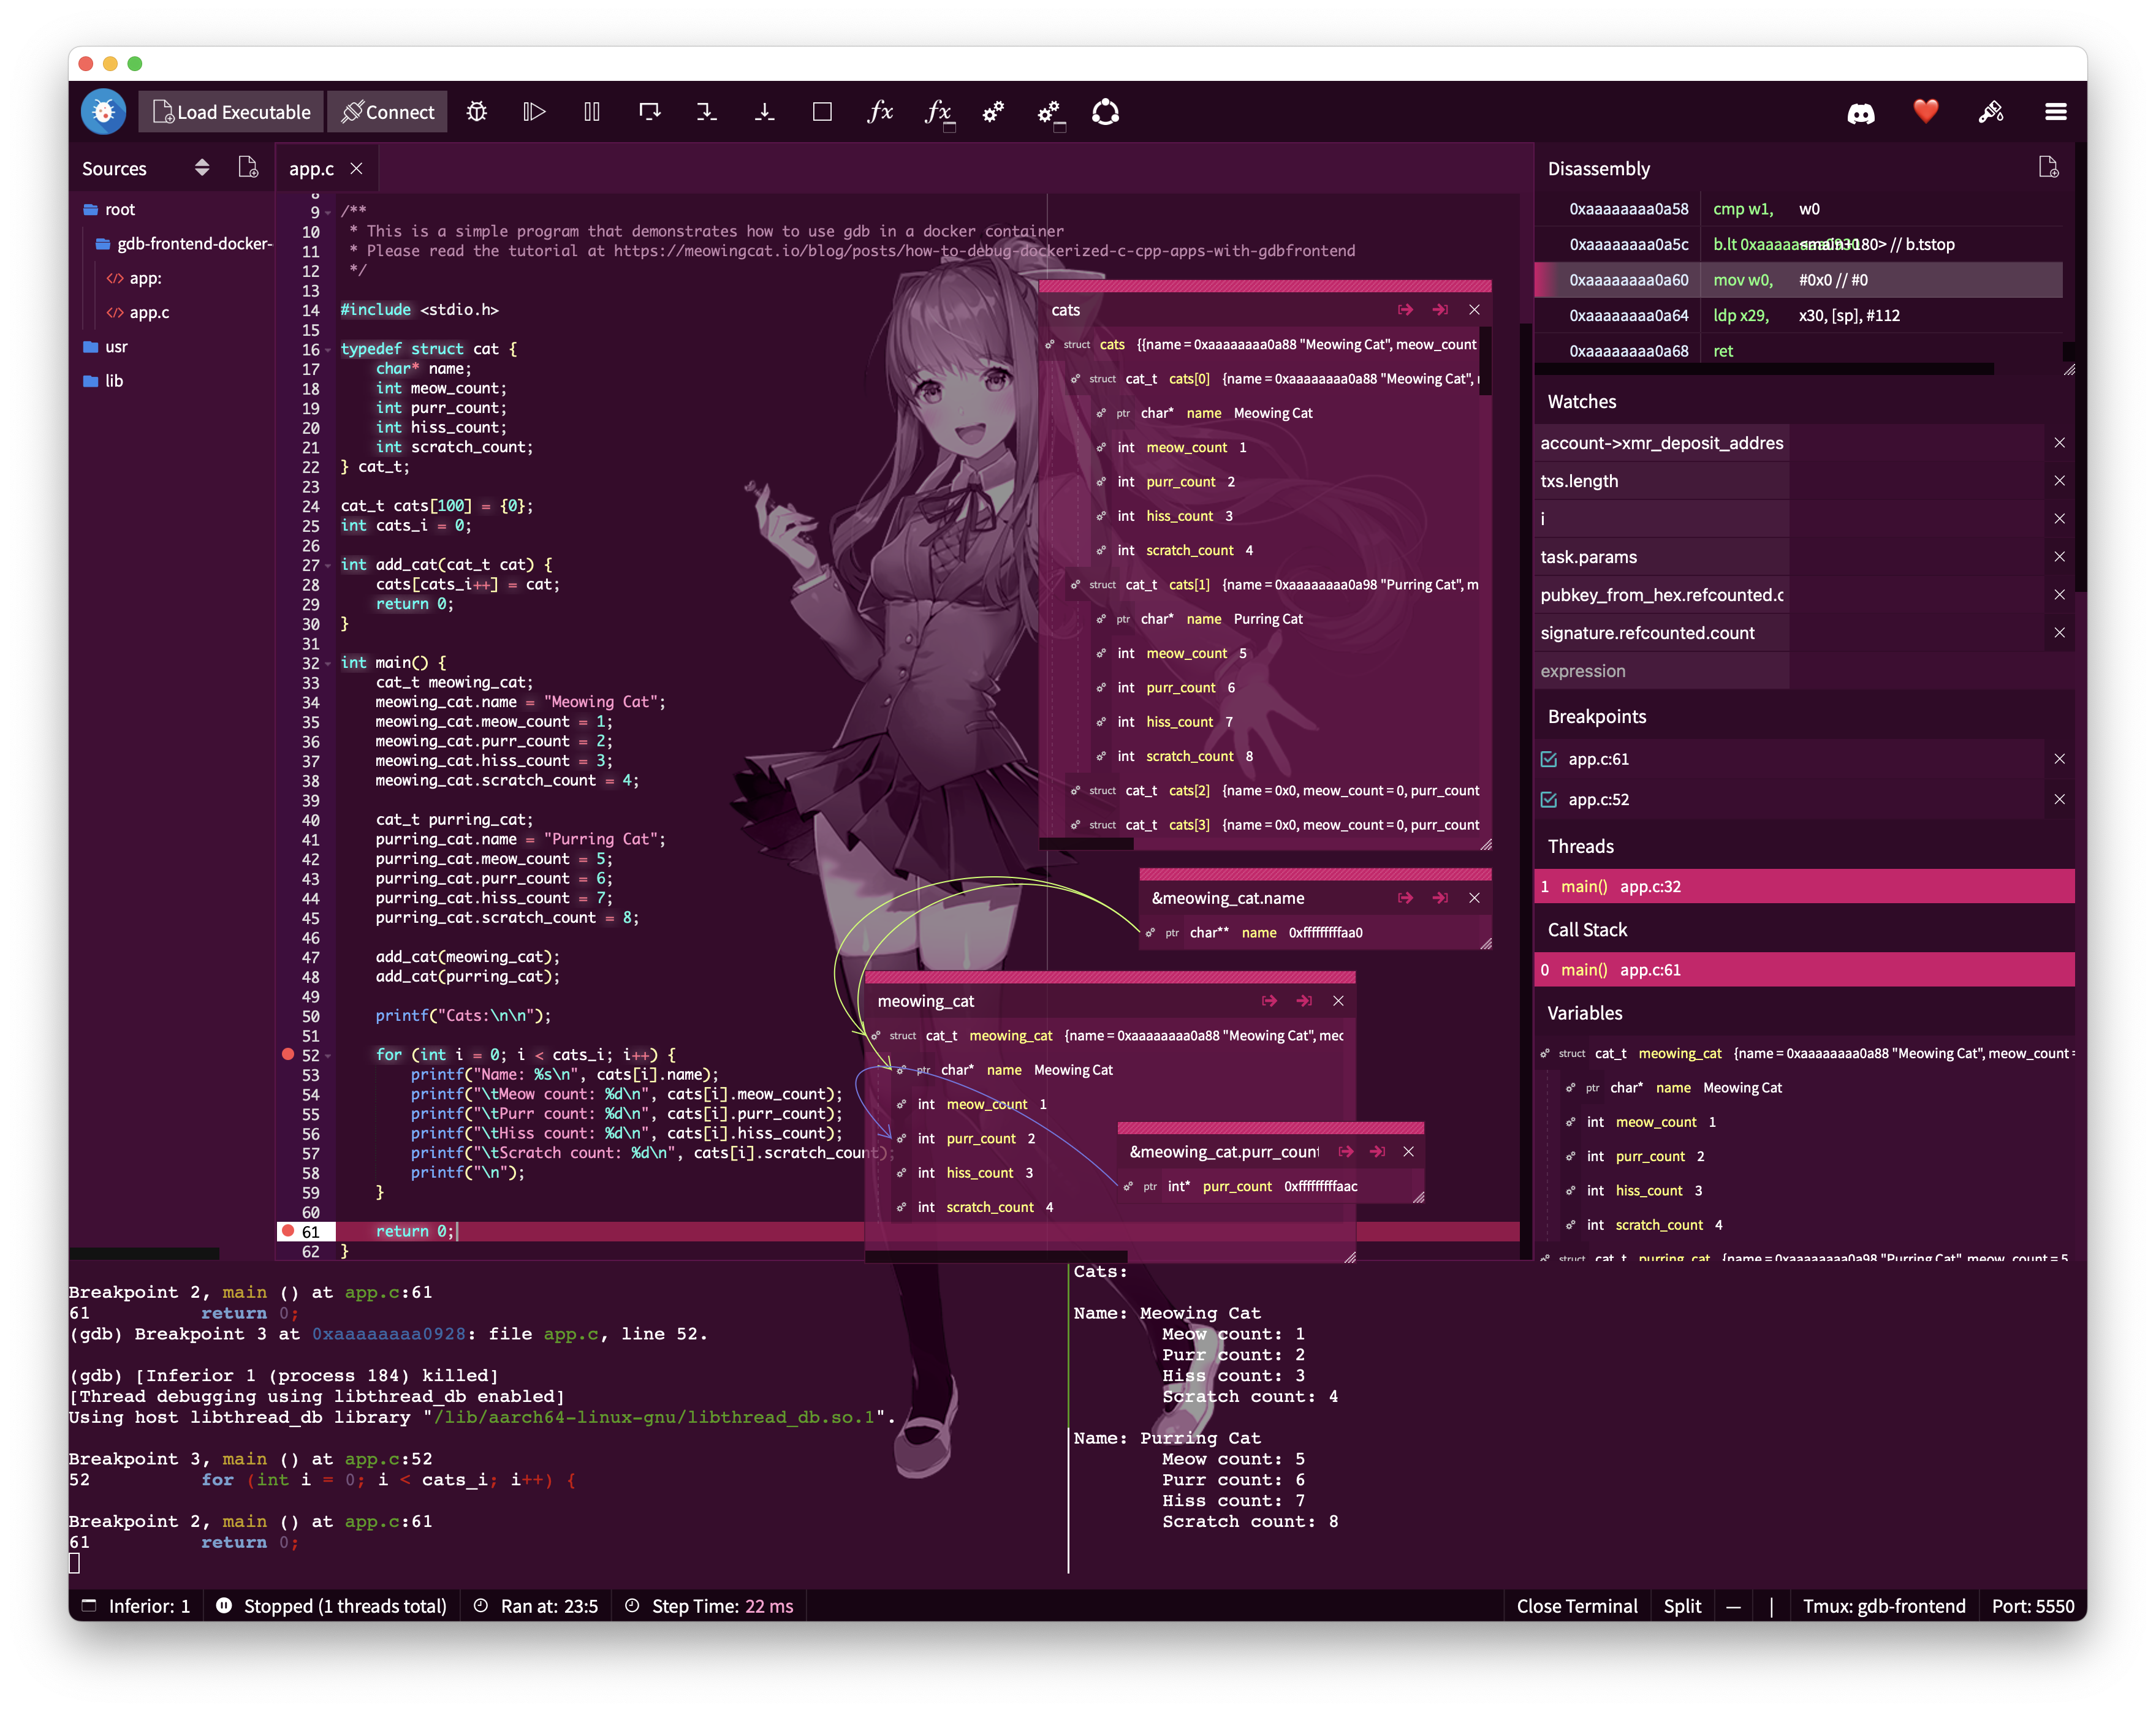
Now our C/C++ application is running inside the Docker container, we can debug it using GDBFrontend.
To access GDBFrontend, open your web browser and navigate to http://localhost:5550.
You should see the GDBFrontend UI, which looks like this:
You can now set breakpoints, inspect variables, and step through your code using GDBFrontend.
Connecting to the GDB shell from any terminal on the host machine
You can connect to the GDB shell from any terminal on the host machine by using the tmux session that GDBFrontend creates.
Just do this:
docker exec -it cats-gdbfrontend tmux a -t gdb-frontendIt’ll look like this in your VSCode terminal:

Troubleshoting
Failed builds on container startup
During the execution of your .gdbinit, you may encounter some issues:
- If building fails, the rest the line
shell makewill not run. - If
r &line which runs the application fails, the rest of the lines will not run.
In these cases, you can see the build output by connecting to the tmux session with tmux attach. Just do docker exec -it cats-gdbfrontend tmux a -t gdb-frontend.
Important! You can use
docker compose upinstead ofdocker compose up -dto see the build output in the terminal or usedocker logs cats-gdbfrontendto see the logs.
Failed builds on Docker container
We’ve just made a docker-make.sh script to build our application inside the Docker container from the host machine and ran it after build by using GDBFrontend’s HTTP API.
But if the build fails, you’ll see the error message in the terminal where you ran the docker-make.sh script.
However, you can do docker exec -it cats-gdbfrontend tmux a -t gdb-frontend in this case too.
Note Another good thing, if you make a build task for VSCode and use the
docker-make.shscript, VSCode will recognize compiler errors and show them in the editor.
Conclusion
Meow! 🐱 In this tutorial, we learned how to debug C/C++ applications running in Docker containers using GDBFrontend.
We created a C/C++ application that stores cats and lists them, built it inside a Docker container, and debugged it using GDBFrontend.
I hope you found this tutorial helpful! If you have any questions or feedback, you can open an issue on the GDBFrontend GitHub Repository and join to the GDBFrontend Discord.
Happy debugging! 🐾